Midac 'Streamer' interface for Peak® Spectroscopy Software
Please visit Midac for more information about the range of instruments that are available.
How to install the software
- Download and install Peak® Spectroscopy Software.
- Download and run the Midac data collection plugin v2 for Peak®.
- Connect the instrument to the computer.
- Make sure the instrument is turned on.
- Set the instrument IP address using IPSetup (see below).
- Start Peak®.
- In Peak®, expand the 'Instrument' toolbox.
- Choose the 'Select Instruments' Tool.
- Place a checkbox next to the 'Midac Streamer' entry in the list.
- Click the 'Apply' button.
- Restart Peak®.
- In Peak®, select the 'Midac Streamer' tool in the 'Instruments' toolbox
- Enter the instrument IP address on the 'Instrument' tab.
Set the IP Address of the Spectrometer
Midac recommends giving the Spectrometer a fixed IP address, rather than one that is assigned automatically through DHCP.This is because the software has to know the IP Address of the spectrometer, and if that address changes dynamically, the software will not be able to communicate with the spectrometer.
Also, addresses that are assigned dynamically are also renewed frequently. If this happens
in the middle of data acquisition, communications may fail.
The IP Address that is programmed into the instrument by Midac during in-house testing is probably not going to work on your network. The IP Address is set through a program called 'IPSetup.exe'. IPSetup.exe is installed into the PeakSpectroscopy program folder.
Use the windows file explorer to navigate to the PeakSpectroscopy program folder and double-click on the IPSetup.exe program. You will see something like this:
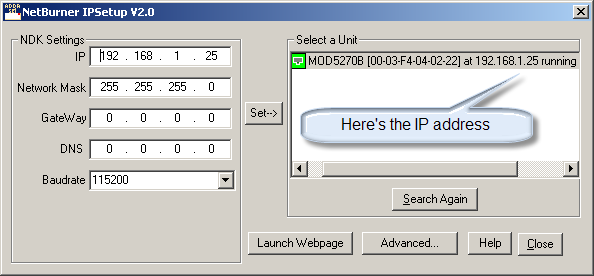
But it will look different for your system.
If nothing shows up in the list on the right, please make sure that everything is cabled together and powered up.
Midac recommends that the spectrometer and computer be on the same subnet.
In the IPSetup picture above, the subnet is '192.16.1', that is, the first three numbers in the four-number tuple that make up the IP Address.
These first three numbers must match the first three numbers of your computer's IP Address.
If you don't know the IP Address of you computer, get to a command prompt by clicking 'Start/Run', and enter 'cmd.exe' in the edit box, then click OK.
You'll get a command prompt, and type 'ipconfig' followed by the enter key.
You'll see something like this:

Here, the address of the computer is 192.168.1.2, so the subnet is 192.168.1.
Now, back in the IPSetup program, enter an IP Address in the 'IP' field in the top left of the dialog.
The IP Address must be on the same subnet but not conflict with any other computers on the subnet.
Click the 'Set' button and see what happens, if it works the instrument will show up in the list on the left with the new IP Address..